Godot
Installation
- Download Latest Godot from Official Website
- Initiate a 2D project (with git) to get started.
- Create three folders and import downloaded assets.
brackeys-2d-tutorial on main [?]
❯ tree
.
├── assets
│ ├── fonts
│ ├── music
│ ├── sounds
│ └── sprites
├── scenes
└── scriptsHow Godot Works
- Node: A building block of a game (e.g., Sprite, TileMap, Camera, Physics, etc).
- Scene: A collection of nodes that function as a unit (e.g., a player, level, or UI).
- Nesting: Scenes can be made up of multiple nodes and nested inside other scenes.
- Scene Tree: A hierarchy where nodes are structured, with changes in one scene reflecting across all instances in the game.
Player 1.0
- Create the game root scene:
- Add Root Node 2D and save renamed Game root scene in its directory.
- Set up player scene:
- Create new scene with node
cmd + AnamedCharacterBody2D. - Add another node named
AnimatedSprite2Dto add graphics to that character. - On the right, select
Sprite Framesunder Animation tab of inspector, and add a new sprite frame. - Add new frames to sprite sheet, resize to match your assets, and add sequentially.
- Change texture to nearest inside project settings for crisp pixel art.
- Adjust animation name, fps, autoplay and position.
- Since physics nodes need shape to interact with objects, add
CollisionShape2Dnode with circle shape under characterBody2D. - Save
playerscene and drag togamescene.
- Create new scene with node
- Integrate player into game:
- Add a
Camera2Dnode togamescene and adjust zoom. Build to see progress. - Add default script to
playerscene.
- Add a
Building will make player fall off due to no floor collision. Add a StaticBody2D node with WorldBoundaryShape2D inside game script. Now you can move around with arrow keys and jump with space.
World Building 1.0
We can start by deleting the temporary StaticBody2D group and use a TileMap node.
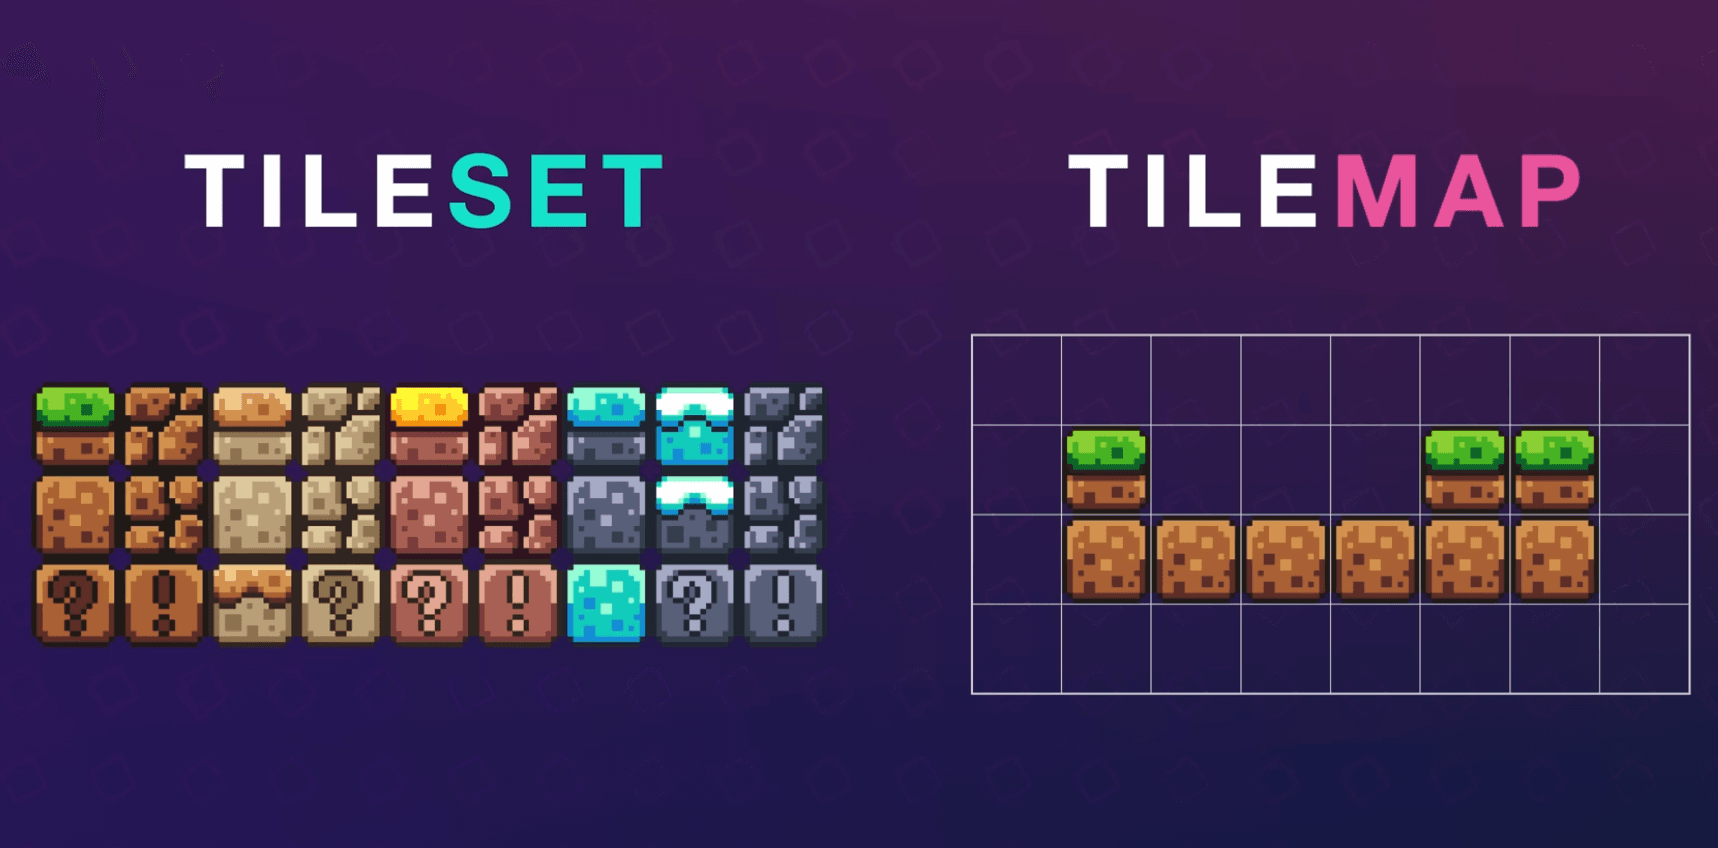
TileSet: Collection of tiles to paint from. TileMap: Node used to paint tiles into our game.
- Select TileSet on inspector tab of TileMap. Adjust size.
- Drag tile asset to TileSet option at the bottom and select yes.
- Setup TileSet by erase wrong tiles and selecting one big tile by holding
shift.
Now you can create an entire map for your game. But no collision.
- Add a new element in physics layer under TileSet in inspector tab. Now add physics to tiles by going to TileSet (bottom) and painting tiles with physics layer 0.
Cto clear physics.Fto fill. Custom hit box per tile by cropping.
Now player can interact with the environment. But camera isn't following him.
Add camera to as a child of player node and smoothen it.
Platform 1.0
Static Platforms
- Create a new scene with
AnimatableBody2Das the root node. - Add a
Sprite2Dnode as a child. - Drag the platform sprite into the Texture property of the Sprite2D.
- Enable "Region" in the Sprite2D properties and adjust the region to show only one platform tile.
- Add a
CollisionShape2Dnode and set its shape to a rectangle matching the platform's size. Also able "One way collision" if you wanna jump on it from below. - Rename the root node to "Platform" and save the scene.
- Instance the platform in your main scene as needed.
Moving Platforms
- Select an instanced platform in your main scene.
- Add an
AnimationPlayernode as a child of the platform. - Create a new animation named "move" at bottom.
- Create a key frame for Platform 2 at position under transition tab.
- Set the animation length (e.g., 2 seconds).
- Create keyframe at 1s after adjusting the platform's position.
- Enable "Loop" mode in the AnimationPlayer.
- Set "Autoplay" to "move" in the AnimationPlayer properties.
Pickups
Coin Pickup
- Create a new scene with
Area2Das the root node. (to only detect if colliding) - Add an
AnimatedSprite2Dnode as a child. - Create new SpriteFrames for the coin animation.
- Add frames from the coin sprite sheet to create the animation.
- Set the animation to autoplay and adjust the speed as needed.
- Add a
CollisionShape2Dnode and set its shape to a circle. - Rename the root node to "Coin" and save the scene.
- Create a script for the Coin scene
- Delete default boilerplate and select node tab inside coin script. Connect
on_body_entered()to detect coins colliding with any body (including moving platforms). - Set player to 2nd physics layer and coin to 2nd mask, to only detect player and coin collision.
- Schedule collided node for deletion using
queue_free().
extends Area2D

func _on_body_entered(body: Node2D) -> void:
	queue_free() # coins +1
Dying 1.0
Death Cam
- Set a below limit to
Camera2Dto prevent camera from following player to its death.
Kill Zone
- Create a new scene with
Area2Das the root node. - Add a
CollisionShape2Dnode and set its shape to world boundary to cover the area where the player should die (e.g., bottom of the screen). (only in game script) - Rename the root node to "KillZone" and save the scene.
- Set it's mask to 2nd second to detect player collision.
- Create a script for the KillZone with
on_body_entered(): - Add a
Timerto restart game after delay. Drag and drop with node to script while pressingcmd. Finally connect totime_outsignal. Can adjust wait time.
extends Area2D

@onready var timer: Timer =  $$Timer

func _on_body_entered(body: Node2D) -> void:
	print("YOU DIED!")
	timer.start()

func _on_timer_timeout() -> void:
	get_tree().reload_current_scene()
World Building 2.0
- Clean up scene tree by adding empty node named coins and platforms.
- Add a new background layer inside inspection tab of
TileMapand fill up as you desire.
General Scripting Stuff
delta: It is the amount of time gone by since the last frame. Used for frame-rate independent physics calculations.Input.is_action_just_pressed(): Checks if an input action was just pressed this frame.Input.is_action_pressed(): Checks if an input action is being held down (hold).Input.get_axis(): Returns a value between -1 and 1 based on the input of two opposite actions.move_toward(curr value, target value, max speed): Gradually changes a value towards a target at a fixed rate.move_and_slide(): Applies currentvelocityto character'spositionincluding collisions.- Signals are used for event driven programming.
func _ready(): only called when node enters scene tree for first time.func _process(): called every frames. (game loop). Variable.func _physics_process()runs at a constant 60 fps to avoid janky physics behaviour.
Enemy
- Create a new scene with
Node2Das the root node named "Slime". - Add the following child nodes:
AnimatedSprite2D: For enemy graphics (add sprite sheet and animate)Killzone: Drag this scene for death on collision.CollisionShape2D: For physics interactions (rectangle).
RayCastLeftandRayCastRight: To detect walls or edges.
- Save the scene as
slime.tscn.
Enemy Behavior Script:
- Attach a script to the enemy node.
- Add constant speed w.r.t delta to character's position.
- Drag (and drop with holding
cmd) both ray casts to slime script to reverse direction when hitting walls. - Also drag
AnimationSprite2Dto script to update graphics to face correct direction.
extends Node2D

const SPEED = 60

var direction = 1

@onready var ray_cast_left: RayCast2D =$$ RayCastLeft
@onready var ray_cast_right: RayCast2D =  $$RayCastRight
@onready var animated_sprite: AnimatedSprite2D =$$ AnimatedSprite2D

# Called every frame.
# 'delta' is used for frame-rate independent calculations
func _process(delta: float) -> void:
	if ray_cast_left.is_colliding():
		direction = 1
		animated_sprite.flip_h = false
	if ray_cast_right.is_colliding():
		direction = -1
		animated_sprite.flip_h = true

	position.x += SPEED * direction * delta
Dying 2.0
- Slow down time using
Engine.time_scale = 0.5inside KillZone script. - Remove the players collision shape and make him jump like Mario.
- KillZone's function
on_body_entered(body)gives direct access to our player.
extends Area2D

@onready var timer: Timer =  $$Timer

func _on_body_entered(body: Node2D) -> void:
	print("YOU DIED!")
	Engine.time_scale = 0.6 # Slow down time
	body.get_node("CollisionShape2D").queue_free() # rmv player collision
	body.velocity.y = body.JUMP_VELOCITY # make player jump
	timer.start()
%%  %%
func _on_timer_timeout() -> void:
	Engine.time_scale = 1 # revert back time
	get_tree().reload_current_scene() # restart game
Player 2.0
Actions: Create keybindings to perform certain action.
- Open Project > Project Settings > Input Map.
- Add action names with keybinding(s).
- Modify player script accordingly.
Update player graphics to face the direction we're moving.
	var direction := Input.get_axis("move_left", "move_right")

	# Flip sprite
	if direction > 0:
		animated_sprite.flip_h = false
	elif direction < 0:
		animated_sprite.flip_h = true
Better Animation
- Add new running, jump and fall animations to player.
- Add frames from sprite sheet.
- Modify player script.
	if not is_on_floor():
		if velocity.y < 0:
			animated_sprite.play("jump")
		else:
			animated_sprite.play("fall")
	else:
		if velocity.x == 0:
			animated_sprite.play("idle")
		else:
			animated_sprite.play("run")
Text
- Use
Labelnode for displaying text on screen - Set text property, position, and customize font (use Pixel font for retro look)
- Will display over background and player.
Score
- Create a node named
GameManangeras first child of Game scene. - Add following script to it with scoring system to add points.
extends Node

var score = 0

func add_point():
	score += 1
print(score)- Refer this function inside coins script after marking Game Manager as unique node
%. Works because in the same scene.
extends Area2D

@onready var game_manager = %GameManager

func _on_body_entered(_body: Node2D) -> void:
	game_manager.add_point()
queue_free() # coins 1+- Display score using a
Labelnode as a child of Game Manager. - Update
ScoreLabeltext whenever score changes from game manager script.
extends Node

@onready var score_label: Label =$$ ScoreLabel

var score = 0

func add_point():
	score += 1
	score_label.text = "Score: " + str(score)
Audio
- Add
AudioStreamPlayer2Dfor background music. - Import music, adjust, autoplay, loop and stuff.
- Adjust volume by adding Buses at Audio tab at bottom.
Now music is replay every the game restarts. To remedy that, we can use autoloads.
- Drag and drop Music nodes into scenes folder, and save.
- Add that scene to Project > Project Settings > Globals > Autoload.
Now music keeps playing. How to add pickup music for coins? Cool shit without coding, only animation keyframes. I'm not documenting that.
- Add
AnimationPlayerand follow the video from 1:11:30
Now pickup sound should play every time you pick up a coins, and coin should be removed from scene.
Export
- Download and install export template :
Editor > Manage Exporter Template. - Access export settings:
Project > Export - Add desired platforms (Windows, Mac, Linux, Web)
- Configure export settings (icon, name, etc.)
- Click
Export Projectand choose output location - Platform-specific notes:
- Windows: Requires
.exeexport - Web: Exports to HTML5 (playable in browsers)
- Mobile (Android, iOS): Requires additional setup (SDKs)
- Windows: Requires
- Tips:
- Test game thoroughly before exporting
- Optimize assets for smaller file size
- Adjust platform-specific settings for best performance
Y-Sorting for 2.5D
- Create game scene with
Node2Dnamed TileMap andCamera2D. - Add a player scene with
AnimationSprite2D,CollisionShape2Dand movement script to Game scene tree. - Create three
TileMapLayernamed "ground", "cliff" and "y-sort" under TileMap. - Enable
Y Sorton game, player and layers. - Paint tiles, physics layer as well as Y Sort Origin to these layers
Enemy
Slime: 2D Node
	AnimatedSprite2D
	CollisionShape2D
	Detection_Area: Area2D
CollisionShape2D- Add 2nd physics layer to player and both layers + mask to slime.
- Also enable Y-Sorting
extends CharacterBody2D

@onready var player := $"../Player"

const SPEED := 100

var chase_player = false

func _physics_process(delta: float) -> void:
	if chase_player:
		var direction := global_position.direction_to(player.global_position)
		velocity = direction * SPEED
	else:
		velocity = velocity.move_toward(Vector2.ZERO, SPEED * delta)
	move_and_slide()

func _on_detection_area_body_entered(_body: Node2D) -> void:
	chase_player = true

func _on_detection_area_body_exited(_body: Node2D) -> void:
chase_player = false- Convert slime's Motion mode to "Floating" to make him not stick to player.
- Also simply use directions, velocity and vectors. Instead of modifying position. Keep it simple.
Layers determine what can detect me Masks determine what can I detect
Enemy Input
# Updates movement based on input and current state.
func _physics_process(_delta: float) -> void:
	if current_state == State.ATTACK_SWIPE:
		velocity = Vector2.ZERO
	elif current_state == State.ATTACK_JUMP:
		var progress: float = get_animation_progress()
		if progress > 0.1 and progress < 0.45:
			velocity = input_direction * JUMP_SPEED
		else:
			velocity = Vector2.ZERO
	else:
		# Get movement input.
		input_direction = Input.get_vector("ui_left", "ui_right", "ui_up", "ui_down")
		if input_direction != Vector2.ZERO:
			if Input.is_action_pressed("shift"):
				current_state = State.RUN
				velocity = input_direction * RUN_SPEED
			else:
				current_state = State.WALK
				velocity = input_direction * WALK_SPEED
		else:
			current_state = State.IDLE
			velocity = Vector2.ZERO
	move_and_slide()